

Step by step guide to deploying ML models on Flask web application with AWS EC2 Instance.


Introduction
Data scientists create models that represent and predict real-world data, yet about 95% of these models get lost in notebooks. To guarantee that these models meet their requirements for real-world applications, like as within a web framework or an Android application, they must be deployed effectively so that they can acquire the necessary data and make accurate predictions.
We'll use the cloud (Amazon Web Services) and a Flask application to deploy our machine learning model for better user engagement in this example.
The full codes for this deployment can be found in the github repository
Step by Step Deployment Processes of ML Models on a Flask Application with AWS EC2 Instance
1. Creating a Machine Learning model:
With Jupyter notebook, creating a machine learning model is simple. We'll use the Life Expectancy Dataset to build a model that can forecast a country's average life expectancy at birth based on a variety of factors. The country, population, GDP, percentage expenditure, total expenditure on health, status, and others are among these characteristics. These datasets were obtained from Kaggle datasets and World bank database.
The problem statement in our case study follows the Regression pattern because it produces a numerical estimate. After completing the ML processes of data cleansing, wrangling, exploratory data analysis, outlier elimination, feature engineering, machine learning pipeline, and model building using several algorithms, the LightGBM model was found to be the best.
# import the necessary libraries
import pandas as pd
import numpy as np
import matplotlib.pyplot as plt
import seaborn as sns

from sklearn.preprocessing import OneHotEncoder, LabelEncoder, StandardScaler
from sklearn.model_selection import train_test_split, StratifiedKFold, cross_val_score, KFold
from sklearn.pipeline import make_pipeline

from sklearn.linear_model import LinearRegression
from sklearn.tree import DecisionTreeRegressor
from sklearn.ensemble import RandomForestRegressor,

from catboost import CatBoostRegressor
from xgboost import XGBRegressor
from lightgbm import LGBMRegressor

from sklearn.metrics import r2_score, mean_squared_error, mean_absolute_error

#Load the dataset
countries = pd.read_csv('./Data/Metadata_Country.csv',encoding='latin1') # data from world bank
life_expectancy = pd.read_csv('./Data/Life Expectancy Data.csv') # kaggle dataset

# Machine learning pipeline for algorithm implementation
from collections import OrderedDict
models = OrderedDict([
    ( "Linear Regression",       Pipeline([
                                            ('preprocessor', preprocessor),
                                            ('LRegressor', LinearRegression())])  ),
    ( "Decision Tree Regressor", Pipeline([
                                           ('preprocessor', preprocessor),
                                            ('DTRegressor', DecisionTreeRegressor())])  ),
    ( "Random Forest Regressor", Pipeline([
                                           ('preprocessor', preprocessor),
                                            ('RFRegressor', RandomForestRegressor())])  ),
    ( "Catboost Regressor", Pipeline([
                                           ('preprocessor', preprocessor),
                                            ('CatBoostRegressor', CatBoostRegressor())])  ),
    ( "Xgboost Regressor", Pipeline([
                                           ('preprocessor', preprocessor),
                                            ('XGBoostRegressor', XGBRegressor())])  ),
        ( "Lightgbm Regressor", Pipeline([
                                           ('preprocessor', preprocessor),
                                            ('LightgbmRegressor', LGBMRegressor())])  )

])

# Sorting the algorithm by the coefficient of determination "R²"
score_df = pd.DataFrame.from_dict(scores, columns=['R²'], dtype = "float", orient="index")
score_df.sort_values(by="R²", ascending=False)
A code snippet from VS code that shows the Jupyter notebook, python libraries and the algorithms implementation.
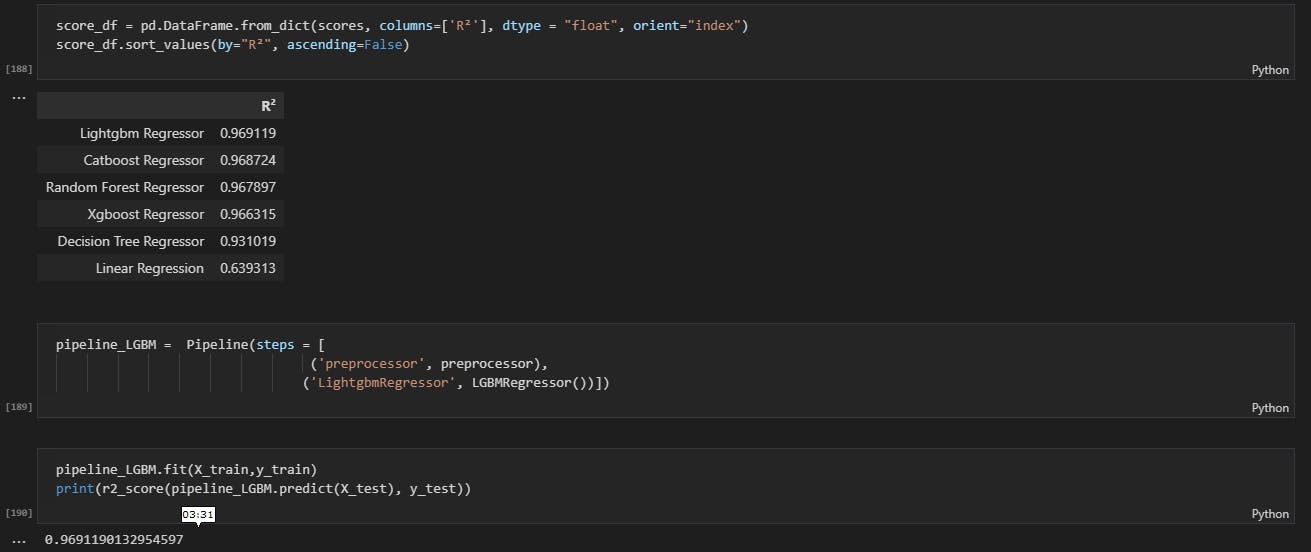 The image above shows the rank of the algorithms
2. Creating a Pickle file to save the model:
Pickle is a standard library in python which is used in serializing machine learning algorithms and saving it to file format .pkl in Python.
import pickle
#save the trained model
pickle.dump(pipeline_LGBM, open('models/pipeline_LGBM.pkl','wb'))
3. Creating a Website templates:
It is necessary to develop a website to collect data from users to make predictions. This folder contains directories, templates - which contains the HTML template and forms that allow users to enter the corresponding variables and see the anticipated average life expectancy - and static - which provides the CSS-styling sheets and JavaScript required for the interface.
<!DOCTYPE html>
<html lang="en">

<head>
    <!-- ========== Meta Tags ========== -->
    <meta charset="utf-8">
    <meta http-equiv="X-UA-Compatible" content="IE=edge">
    <meta name="viewport" content="width=device-width, initial-scale=1">
    <meta name="description" content="ML Prediction Page">

    <!-- ========== Page Title ========== -->
    <title>ML Prediction page</title>


    <!-- ========== Start Stylesheet ========== -->

    <link href="{{ url_for('static', filename ="assets/css/bootstrap.min.css")}}" rel="stylesheet" />
    <link href="{{ url_for('static', filename ="assets/css/flaticon-set.css")}}" rel="stylesheet" />


</head>

<body>


    <!-- Start Banner
    ============================================= -->
    <div class="banner-area text-center text-normal text-light shadow dark bg-fixed" style="background-image: url('/static/1.jpg');">
        <div class="box-table">
            <div class="box-cell">
                <div class="container">
                    <div class="row">
                        <div class="col-md-8 col-md-offset-2">
                            <div class="content">
                                <h1>This App implements Machine Learning to predict results which had been trained with Life Expectancy datasets.</h1>
                                <p>
                                    The model learns from the data and predicts 96% accuracy.
                                </p>

                                <button class="btn-success btn-sm" style="border-radius: 16px;" onclick="location.href='/predict'">Click Here To Predict</button>
                            </div>
                        </div>
                    </div>
                </div>

            </div>
        </div>
    </div>
    <!-- End Banner -->

    <!-- Start Companies Area

    <!-- jQuery Frameworks
    ============================================= -->
    <script src="{{ url_for('static', filename ="assets/js/jquery-1.12.4.min.js")}}"></script>
    <script src="{{ url_for('static', filename ="assets/js/bootstrap.min.js")}}"></script>


</body>
</html>
4. Creating a Flask Application:
Flask is a Python-based web application framework. It has a wide range of options and libraries for creating web applications. It makes it easier to call Restful APIs using Python.
# import required libraries
from flask import Flask
from flask import render_template, request, url_for, jsonify
import pickle
import pandas
import os
import numpy

# Assign parameters such as static folder names- static

STATIC_DIR = os.path.abspath('./static')

#initialize the flask app
app = Flask(__name__,static_folder=STATIC_DIR)

# load the data via pickle file for prediction
model = pickle.load(open('models/pipeline_LGBM.pkl','rb'))

# state the columns for imputing variables
column =['country', 'year', 'status', 'adult_mortality', 'infant_deaths',
       'alcohol', 'percentage_expenditure', 'hepatitis_b', 'measles', 'bmi',
       'under-five_deaths', 'polio', 'total_expenditure', 'diphtheria',
       'hiv/aids', 'gdp', 'thinness__1-19_years', 'thinness_5-9_years',
       'income_composition_of_resources', 'schooling', 'region', 'incomegroup',
       'Population']

# rendering the homepage template with index function
@app.route("/")
def index():
    return render_template("Home.html")

# rendering the predict.html as it contains the parameters needed for the prediction.
# it requires both the GET for the default value prediction and POST request for prediction if pred.html forms is filled by the User
@app.route('/predict',methods=['GET','POST'])
def predict():
    '''
    For rendering results on HTML GUI
    '''

    #creates the single function for getting data

    req = request.form
    country = req.get("country",default='Nigeria')
    year = int(req.get("year",default=2021))
    status = req.get("status",default= 'Developing')
    adult_mortality = int(req.get("adult_mortality",default=343))
    infant_deaths = int(req.get("infant_deaths",default=72))
    alcohol = float(req.get("alcohol",default=13))
    percentage_expenditure = float(req.get("percentage_expenditure",default=2300))
    hepatitis_b = float(req.get("hepatitis_b",default=88))
    measles = float(req.get("measles",default=6718))
    bmi = float(req.get("bmi",default=25))
    under_five_deaths = int(req.get("under_five_deaths",default=114))
    polio = float(req.get("polio",default=80))
    total_expenditure = float(req.get("total_expenditure",default=7))
    diphtheria = float(req.get("diphtheria",default=24))
    hiv_aids = float(req.get("hiv_aids",default=100))
    gdp = float(req.get("gdp",default=480000))
    thinness_10_19_years = float(req.get("thinness_10_19_years",default=13.4))
    thinness_5_9_years = float(req.get("thinness_5_9_years",default=13.2))
    income_composition_of_resources = float(req.get("income_composition_of_resources",default=0.52))
    schooling = float(req.get("schooling",default=10.9))
    region = req.get("region",default='Sub-Saharan Africa')
    incomegroup = req.get("incomegroup",default='Lower middle income')
    population = float(req.get("population",default=214140000))


    #storing the data in array format
    array = numpy.array([country,year,status,adult_mortality,infant_deaths, alcohol,percentage_expenditure, hepatitis_b, measles, bmi, under_five_deaths, polio, total_expenditure,diphtheria, hiv_aids, gdp, thinness_10_19_years, thinness_5_9_years, income_composition_of_resources, schooling, region, incomegroup, population]).reshape(1,23)

    #creates a dataframe to hold the data
    data = pandas.DataFrame(data=array,columns=columns)

    #predict over the features gotten from the user with the model
    prediction = model.predict(data)
    output = round(prediction[0])

    #passing value gotten to Predict html template for rendering
    return render_template("Predict.html",prediction_text='The Average life expectancy for {} in year {} is {} years'.format(country, year, output))

# port values changes as we run on local server and in the cloud

if __name__ == '__main__':
   app.run(host = '0.0.0.0', port = 8080) # cloud
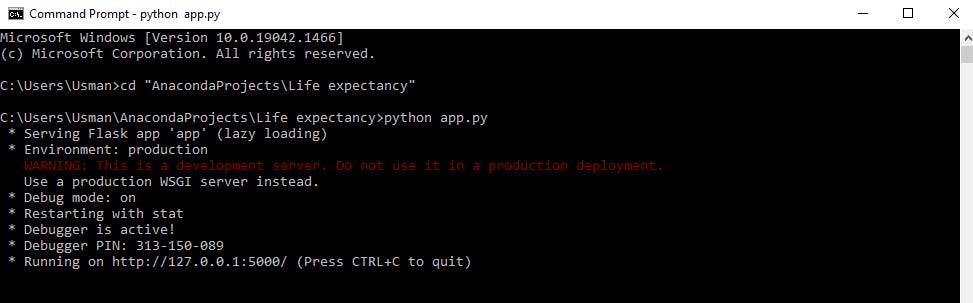
To run this in our local environment, navigate to the directory using CMD- command prompt and type python app.py.
5. Creating an AWS account:
Once our ML models have been deployed successfully locally, we will move on to our main goal: leveraging cloud services to deploy our ML models via AWS. We'll need to register and create an AWS account. We will acquire a year of free tier service by using our credit card information. This will be beneficial in accomplishing the task at hand.
After successfully registering, we must sign in with our user ID to access the AWS Management Console.

6. Downloading the Necessary Softwares:
To accomplish our aim, there is a need to download two software required to ensure our application runs successfully by connecting our local environment with AWS EC2 Instance. These includes:
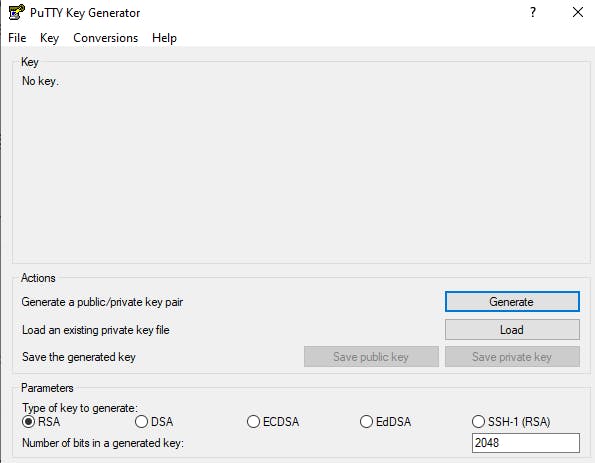
I. PuTTy:
This is an open-source free terminal emulator, serial interface, and network file transfer program. Its primary advantage is to allow users to run supported protocols, including SSH and Telnet, remotely. This comes with another open-source networking client PuTTygen - a key generator tool for creating pairs of public and private SSH keys. This is used to convert our private SSH key from PEM file to PPK file.
After successfully installation, you can search for PuTTygen in your local machine as it looks like the image below
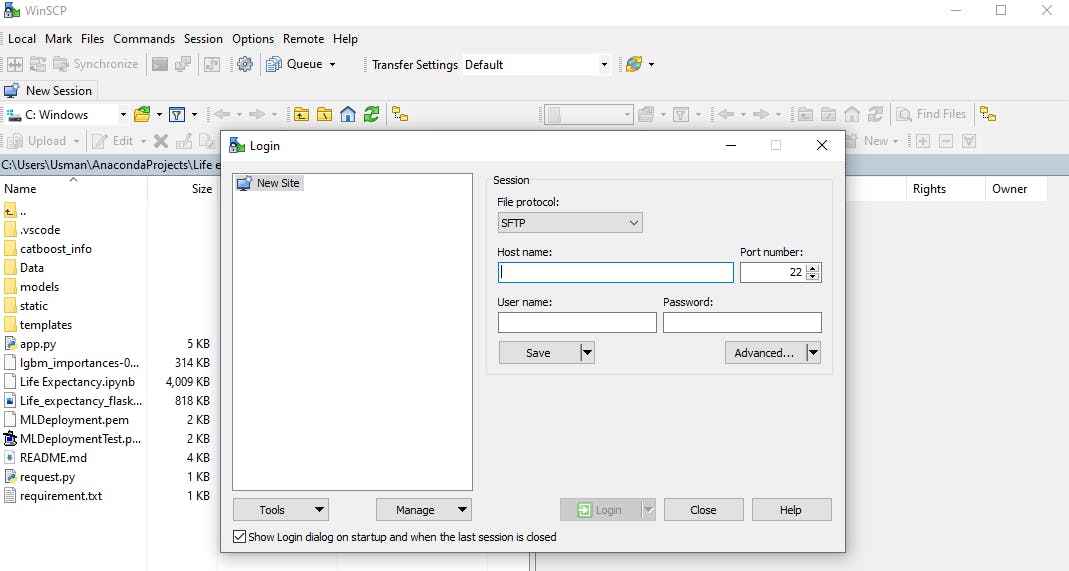
II. WinSCP:
This is a popular free SFTP and FTP client, a powerful file manager for Windows. It offers an easy-to-use GUI to secure files transfer between a local and remote computer using multiple protocols: Amazon S3, FTP, FTPS, SCP, SFTP, or WebDAV. The application looks like the image below after successful installation.
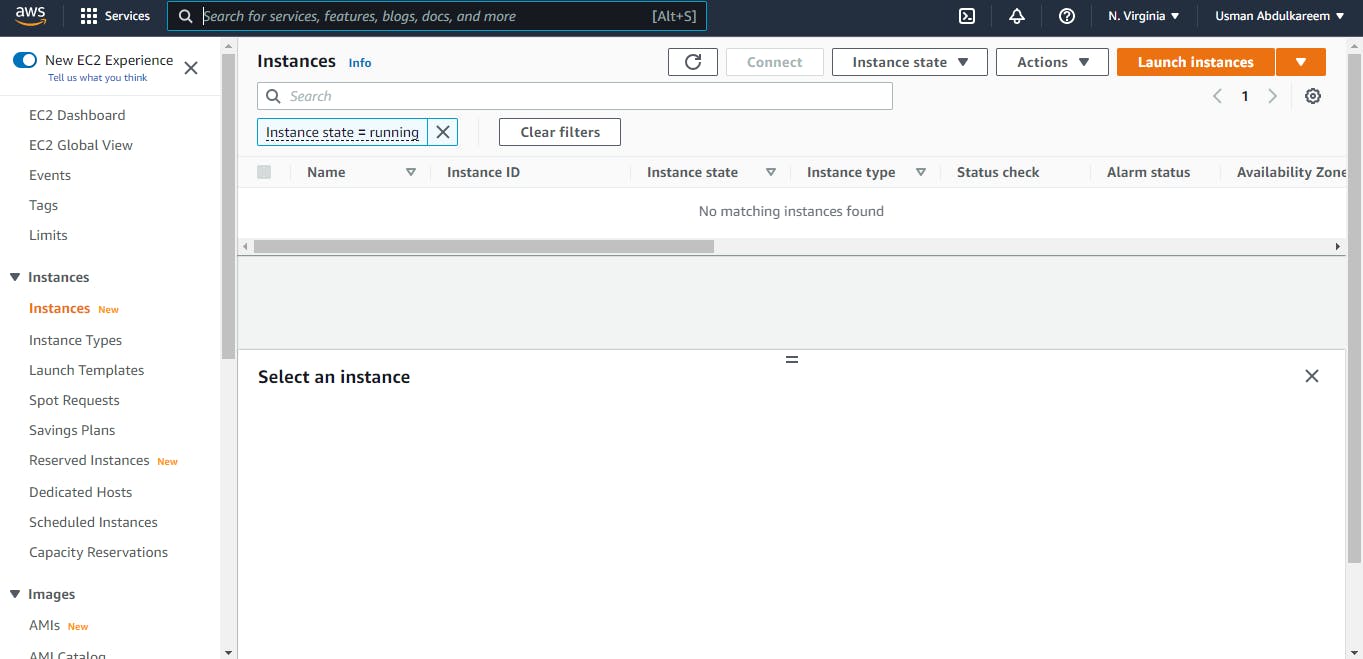
7. Creating an AWS EC2 Instance:
A search for EC2 Instance can be done through the AWS Management Console. The image below depicts the AWS EC2 Dashboard.
The following steps will ensure a successful launch of an AWS EC2 Instance.
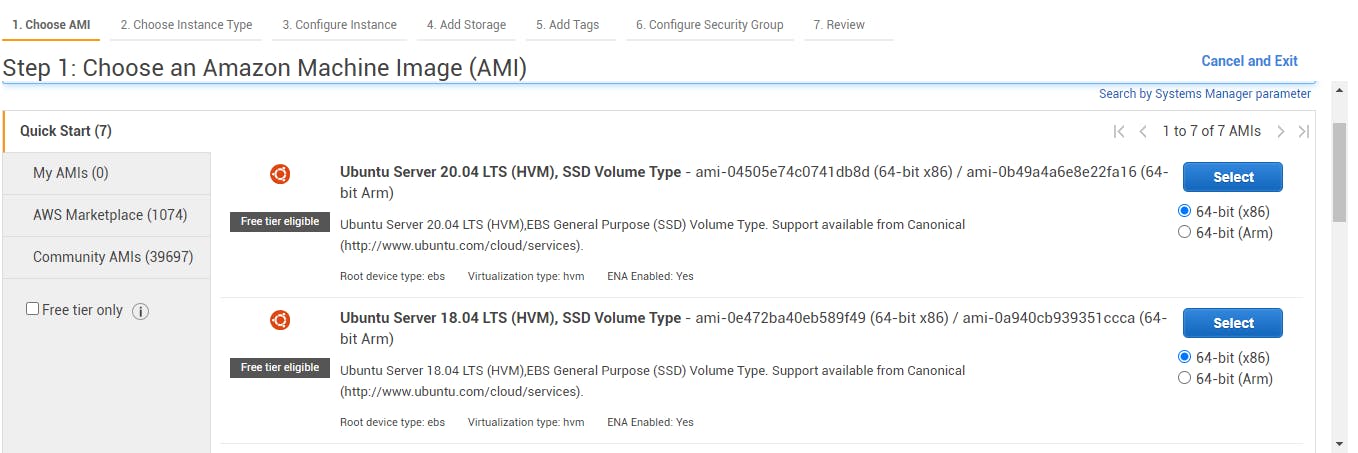
I. Choosing the AMI template:
AMI - Amazon Machine Image is a template that contains the software configuration (OS), application server and applications required to launch EC2 Instance. In this case, we are going to be choosing the free tier template- Ubuntu Server 20.04 LTS (HVM), SSD Volume Type.
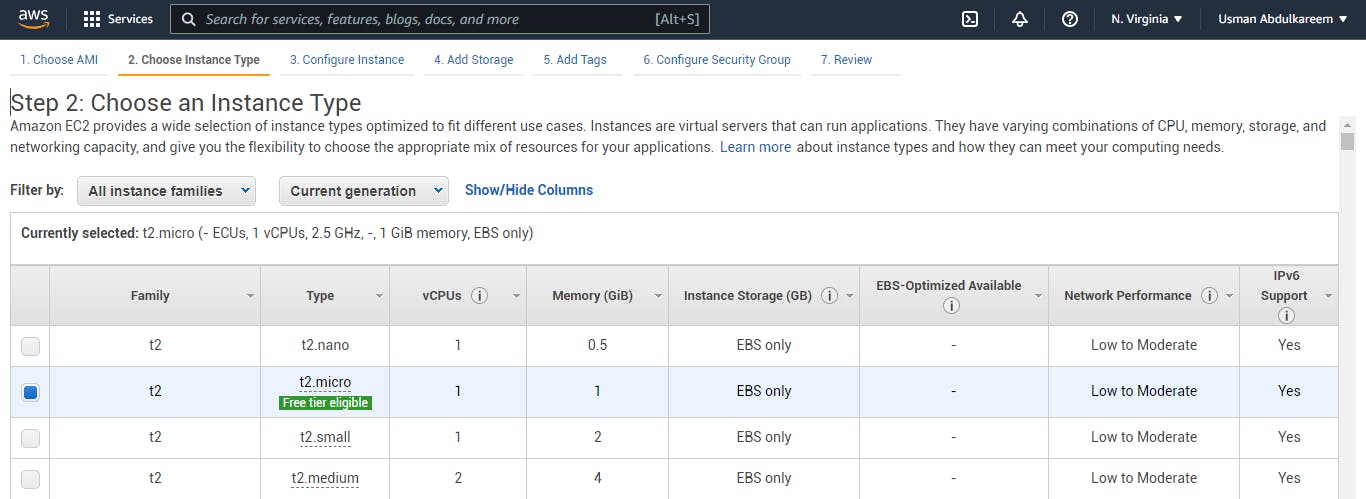
II. Choosing an Instance Type:
An instance type that suit our free tier will be chosen to avoid charges from our credit cards. Below is an image that shows a free tier instance type- t2 micro eligible.
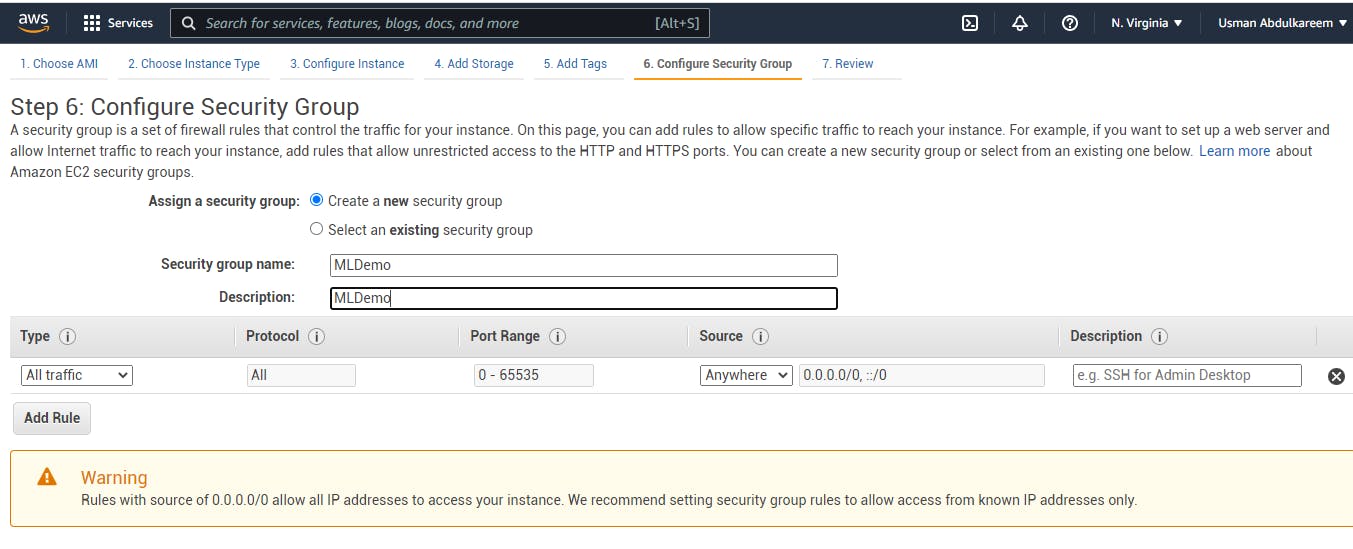
III. Configuring the Security Group:
In AWS, security groups are the foundation of network security. They manage the flow of traffic into and out of the EC2 instance. We'll skip to the security group setting because the other default steps are sufficient for our deployment. Because we want our program to operate on several screens with the host-name, we must change the type to All traffic and the source to Anywhere in this situation. The configuration is shown in the image below.
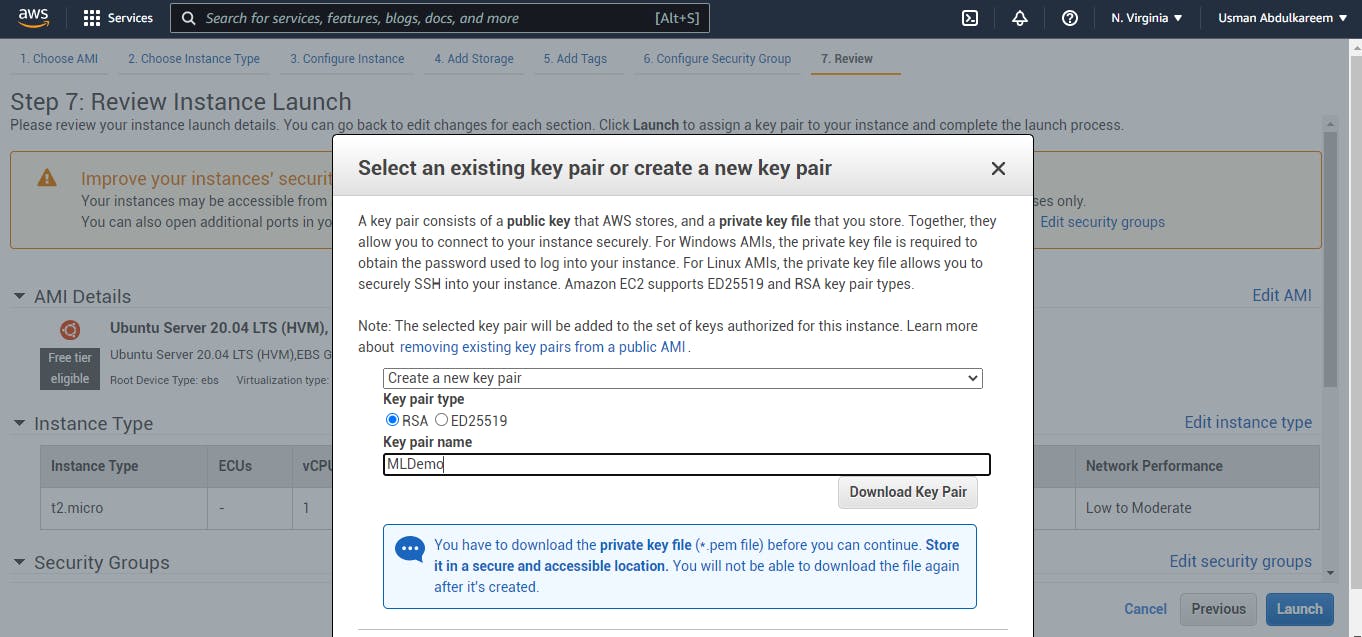
IV. Reviewing and Launching:
We inspect the processes and launch our Instance after carefully configuring the security group. Here, we'll create a new key pair that will allow us to connect to the instance securely. We'll rename it to our liking, then download the key pair and store it in the project's directory folder. The graphic depicts key-pair creation, renaming, and downloading.
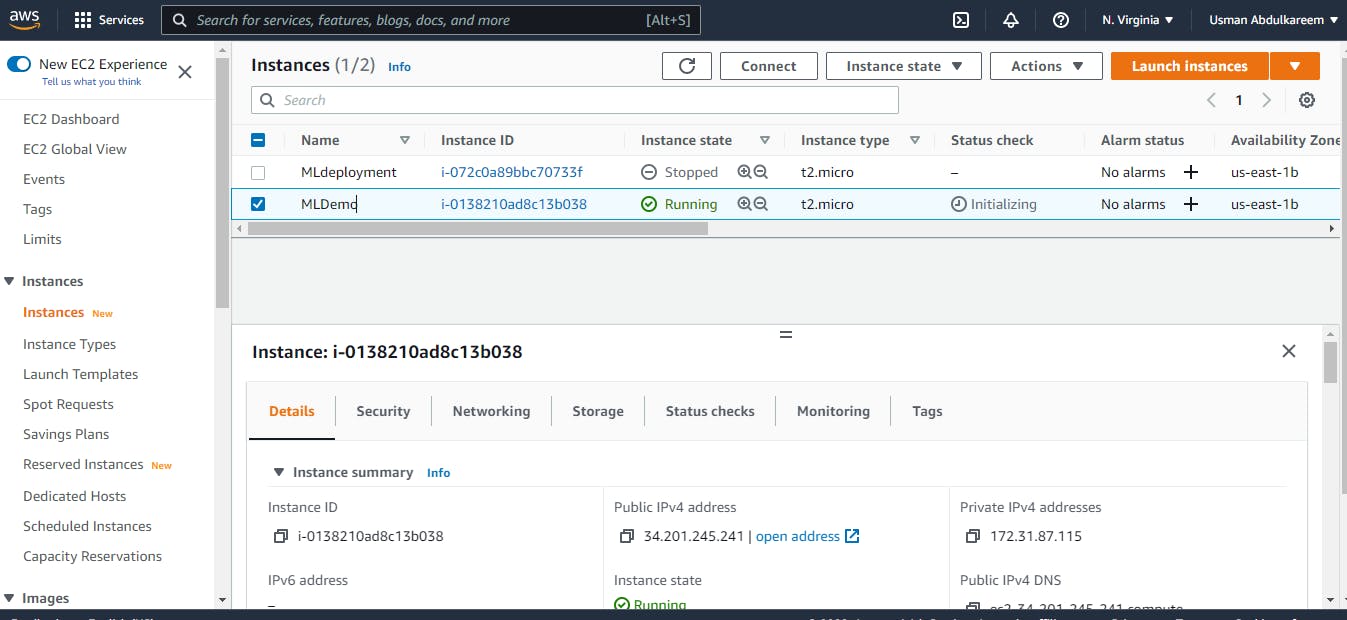
V. EC2 Instance launch successfully:
We'll proceed to start the EC2 instance, which may take a few seconds. In the EC2 Dashboard, here's a screenshot of a successful launch of an EC2 Instance.
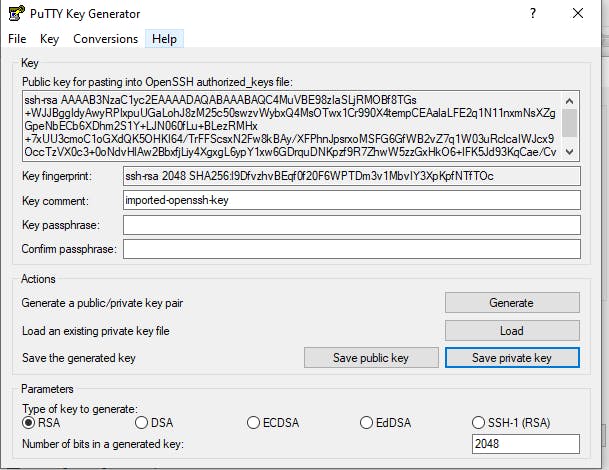
8. Creating a Private Key PPK File with PuTTygen:
We'll create a private PPK file by converting the PEM file that was downloaded when the instance was launched and loading it with PuTTygen. To retrieve our PEM file from our project folder, load and store the private key generated into our folder, we indicate that all files are presented. The screenshot below depicts the creation and saving of the PuTTygen private key.
9. Securing Transfer of project files via WinSCP:
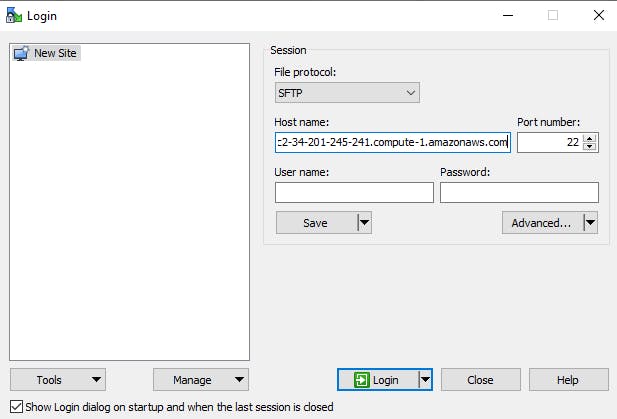
WinSCP, as previously stated, aids in the secure transfer of files from a local workstation to a remote computer. This will allow us to drag and drop the files/codes we need into the EC2 Instance we've just established. To begin, we'll start WinSCP, which will prompt us to provide a host name.
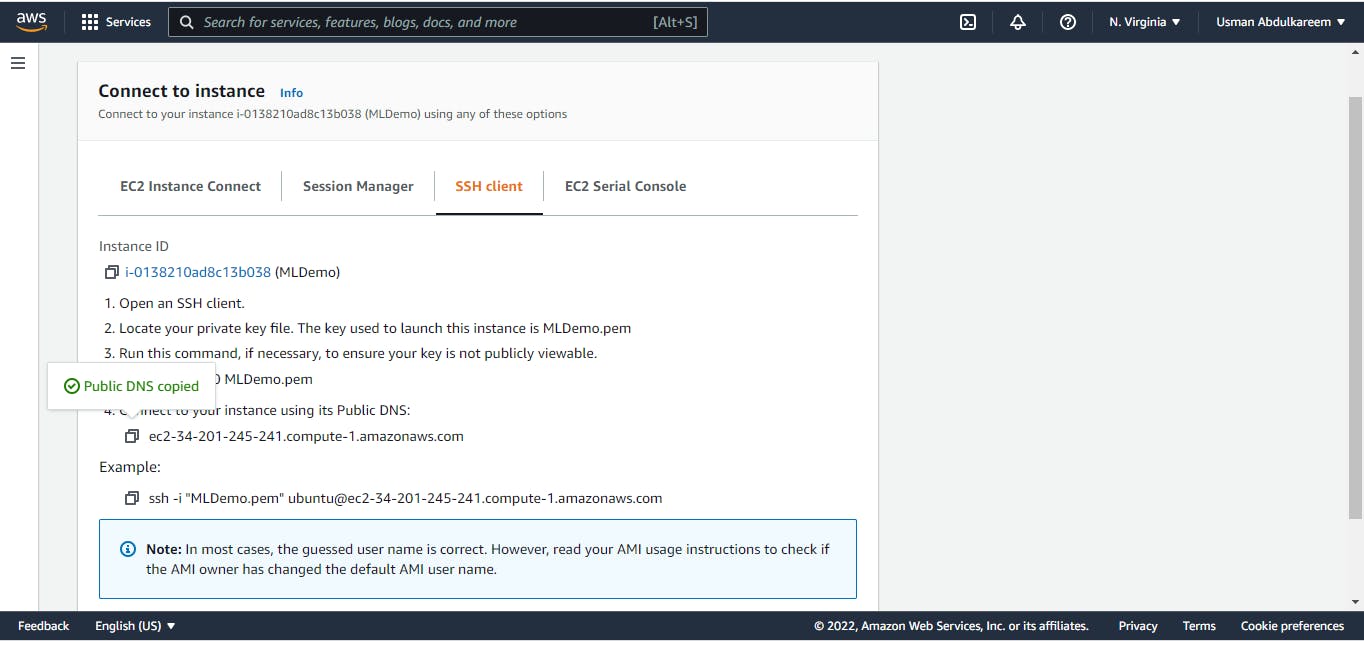
Second, we'll get the host name from the EC2 dashboard by clicking on the connect tags, then copy and paste the Public DNS from the SSH client. In WinSCP, we'll use this as our host name.
The images below show the EC2 Dashboard's imputation of the host name.
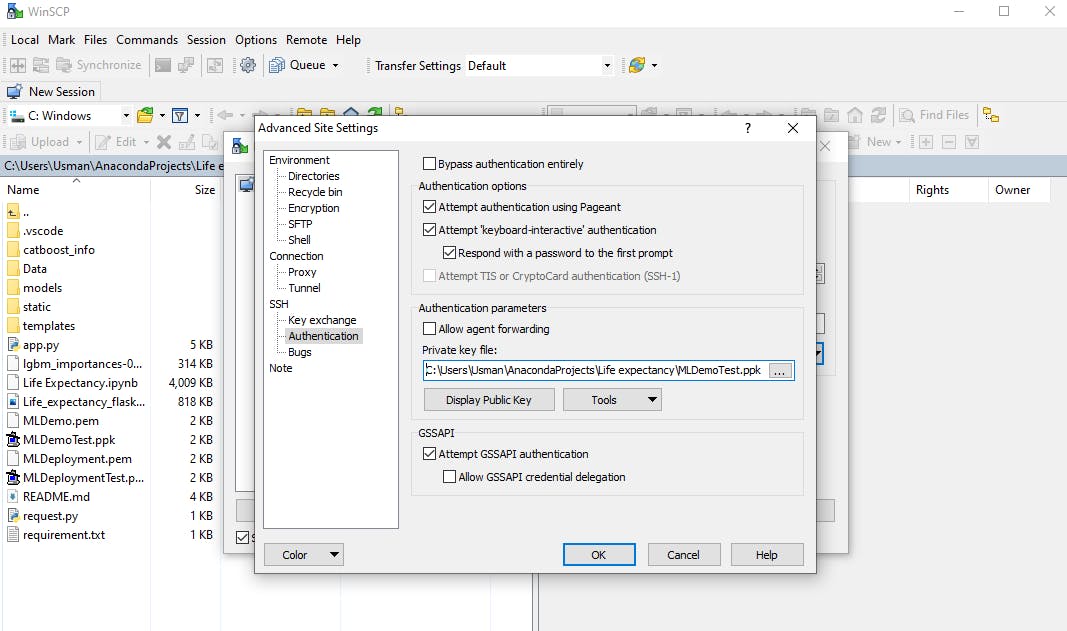
Now we'll go to WinSCP's Advanced Site Settings, find SSH, and click on Authentication to load our private key PPK file generated with PuTTygen.
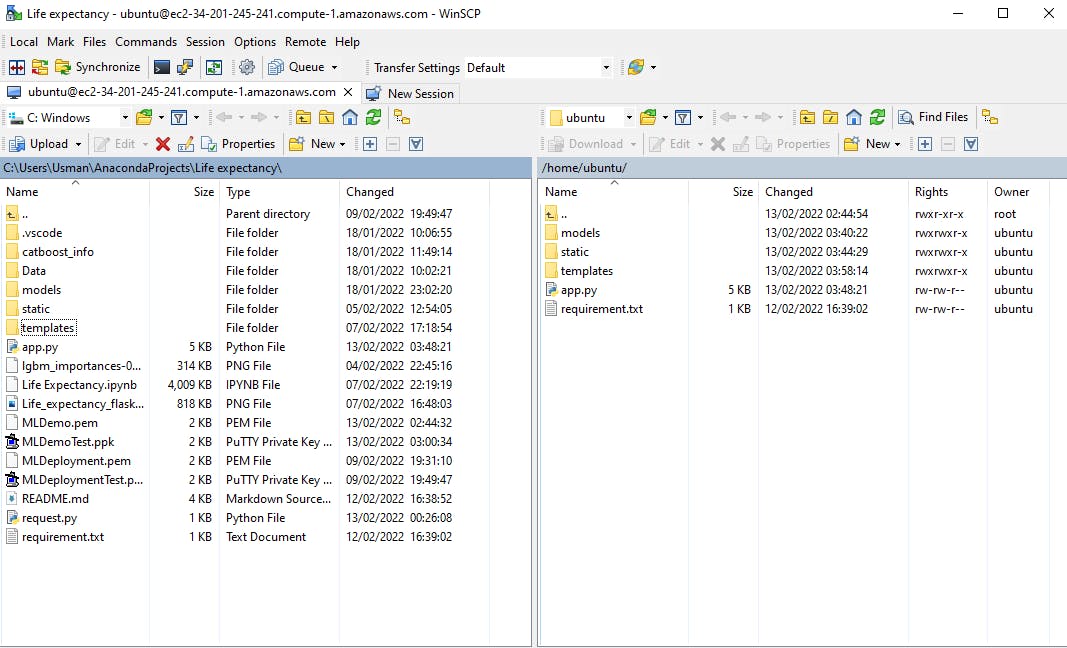
After that, we select Ok, Create a Username. For my user name, I went with ubuntu. After that, we log in to connect to our Ubuntu server. We also choose our code files by dragging and dropping them into the WinSCP windows on the right side. The amount of time it takes to transfer files is determined by their size. The requirement.txt file is included in these files to allow the installation of the python libraries required to execute the model.
Note:
When deploying our model outside of our local system, the IP address and Port number in the Flask app python code must be modified from the defaults of '127.0.0.1' and '5000' to '0.0.0.0' and '8080' to enable smooth execution of the app.py in the cloud using PuTTy terminal.
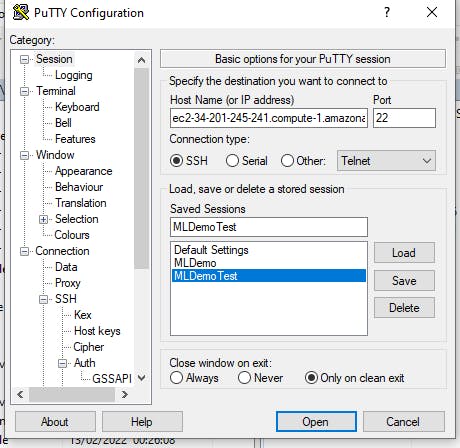
10. Installing the required libraries with PuTTy:
To begin the configuration of the PuTTy app, we will locate it on our system. We'll start by imputing our hostname, as we did before, and then name the Saved Session. Go to the SSH, locate the Auth and load the saved private PPK file. After that, we go to Session category to save the name, click on it, and open it with PuTTY. The configuration, name, and opening of the saved file are shown in the image below.
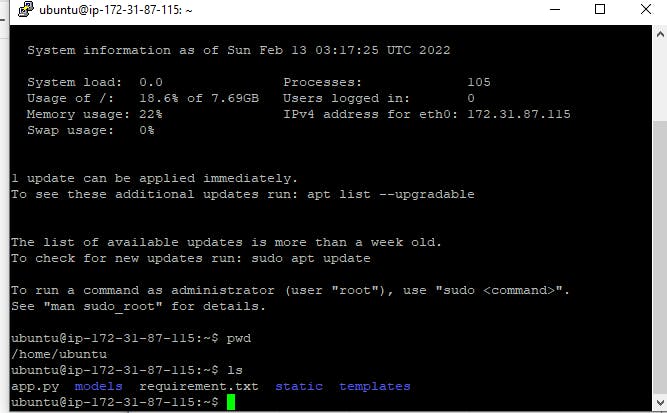
We'll communicate with our terminal to confirm that all essential files are uploaded successfully. The screenshot below shows how to use the Git bash to interact with Ubuntu Server.
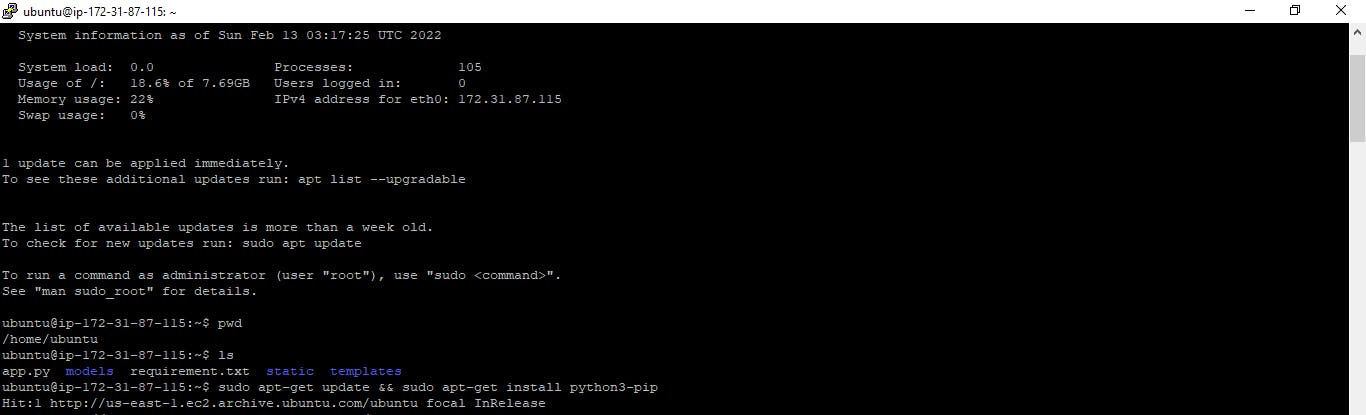
We must first update and install python with the command below to successfully install our libraries into our Ubuntu cloud server.
sudo apt-get update && sudo apt-get install python3-pip
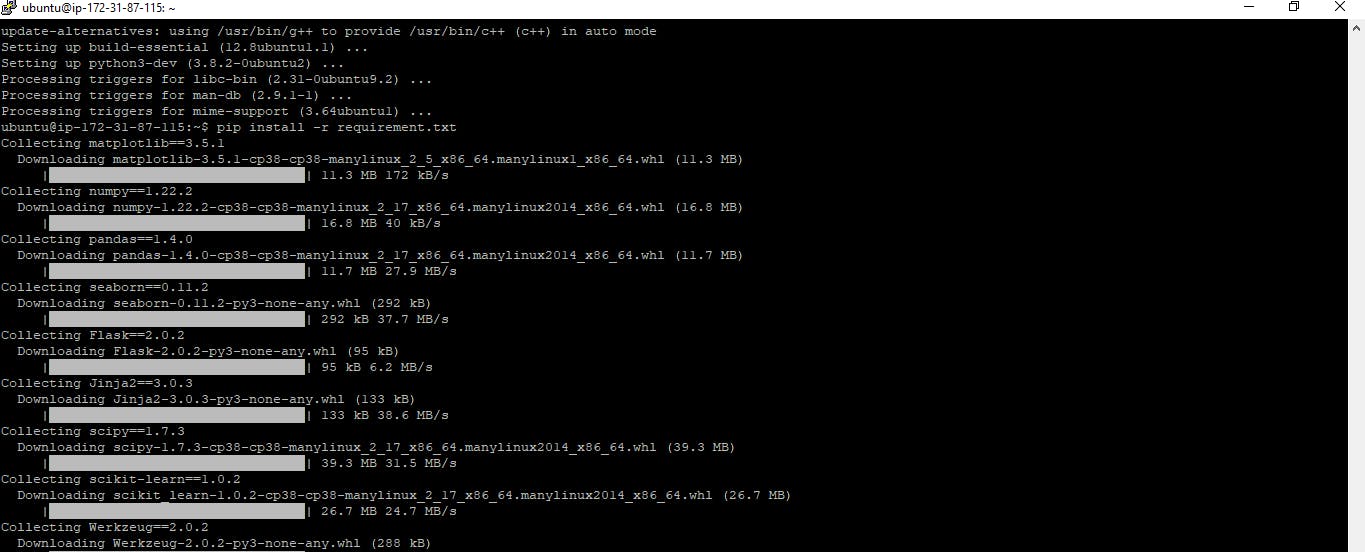
Also, to install the required python libraries needed to run the model i.e requirement.txt file, we can execute this by running the command.
python install -r requirement.txt
11. Running the Flask application in the ubuntu terminal::
Now that our libraries have been installed successfully, we can execute the program by typing the following command in the terminal.
python3 app.py
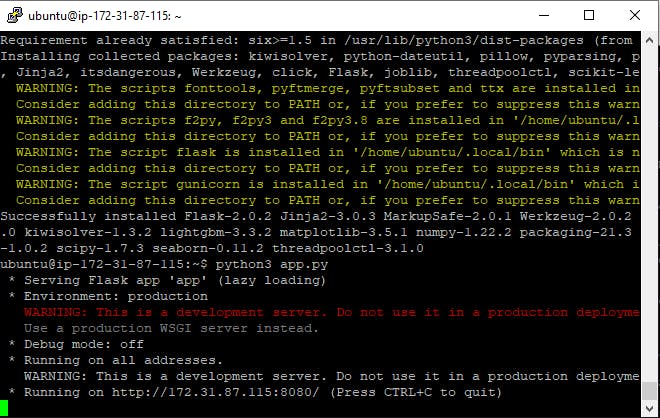
The application has now begun to run. Then, to view our application, we'll go to the EC2 dashboard and locate the connect tags, then use the SSH client to copy the Public DNS.
The URL for our application will be Public DNS + port 8080, as seen in the example below:
ec2-34-201-245-241.compute-1.amazonaws.com:8080
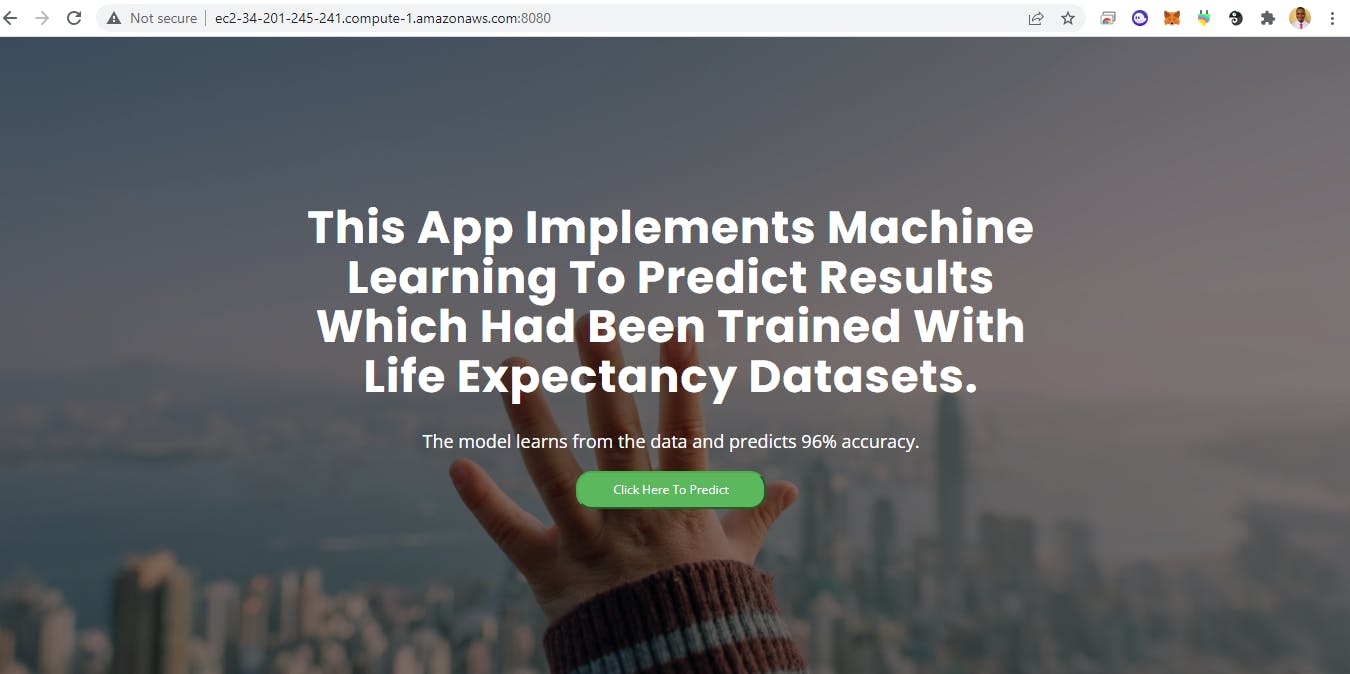
The home web page of the application is shown below:
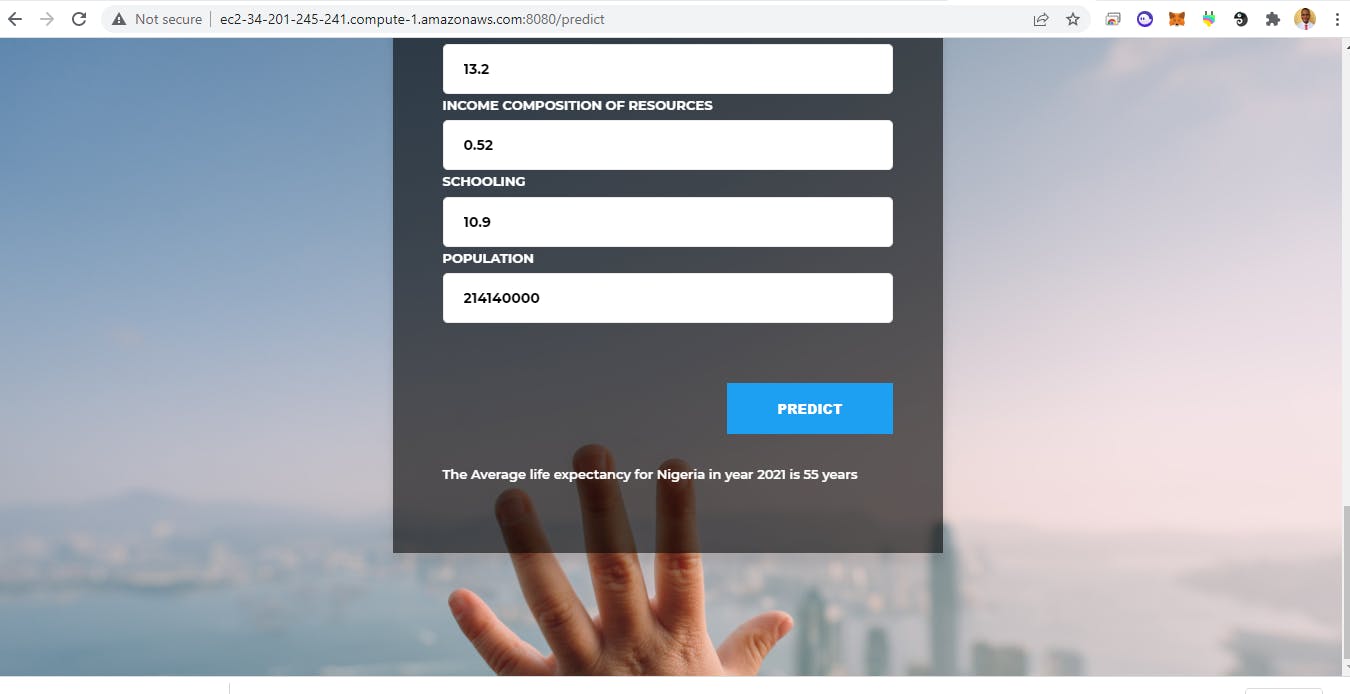
The prediction web page of the application is display as the snapshot below:
12. Final launch of the application:
It was observed that if the terminal closed, and a new page was opened to restart the application, an error occurred. The following error surfaced::
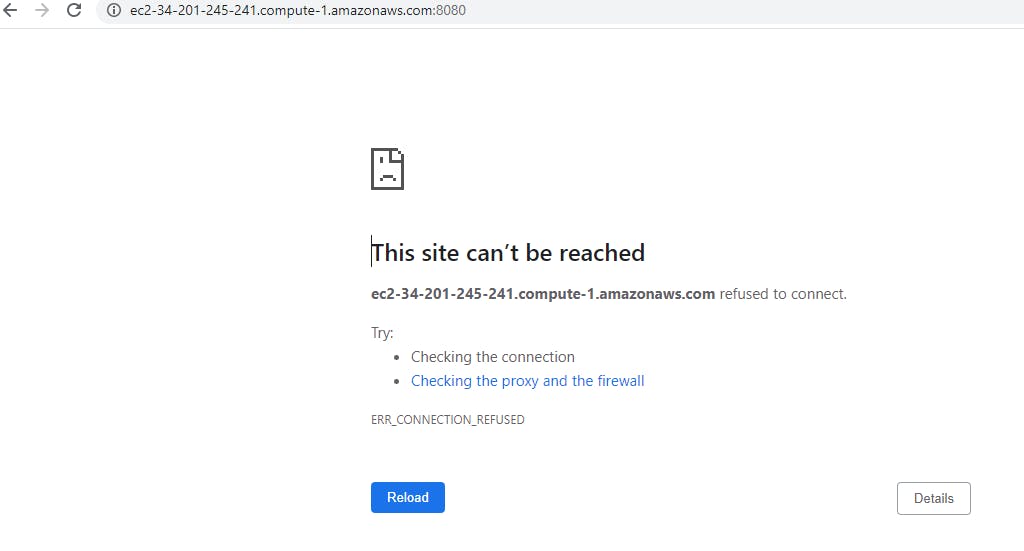
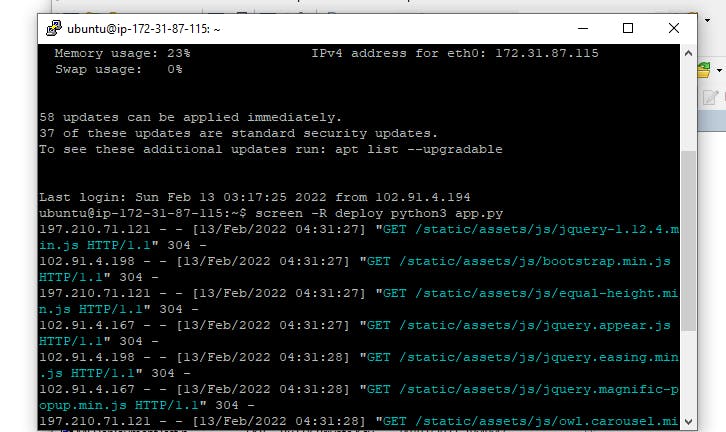
To resolve this problem, we'll need to employ GNU Screen, a full-screen window manager that divides a physical terminal into numerous processes, most commonly interactive shells. Our application will continue to operate even if the window is not visible after disconnection, and our server will remain active by establishing numerous displays even when the git bash terminal is closed.
When the code below is run, it allows the URL to be opened in several browser pages.
screen -R deploy python3 app.py
The code is implemented in the git bash terminal as seen in the image below.
Brief summary:
I learned the following from this writing:
The steps involved in performing an end-to-end machine learning project.
Using the pickle python package to save a machine learning model as a ".pkl" file.
A small-scale web application using the Flask back-end python library.
The processes for launching an Amazon Web Services EC2 instance.
Additional software such as PuTTy and WinSCP are introduced for successful file deployment and transfer from a local machine to a remote computer.
Using the Git bash Ubuntu terminal to install libraries and execute the flask application.
Conclusion:
In this way, we can leverage the cloud services (AWS EC2 Instance) and flask web application to deploy our Machine learning model.
Thanks for reading my article. I would very much appreciate your feedback, suggestions, and critics of my approach to writing. I'm open to collaborations that will further increase my knowledge and growth in ML. Feel free to connect with me on LinkedIn.